DIY projects have become increasingly popular in recent years, allowing individuals to unleash their creativity and create unique pieces for their homes. One such project that has gained significant attention is crafting a stunning DIY table with real flowers and epoxy resin. This captivating combination of natural elements and modern materials can transform a simple table into a work of art. In this step-by-step guide, we will explore the process of creating your very own flower and epoxy table, from selecting the materials to adding the finishing touches.

Materials needed for creating a stunning DIY table
Before diving into the creation process, it is essential to gather all the necessary materials. Here’s a list of items you’ll need:
- A table: Choose a sturdy table with a flat surface that will serve as the canvas for your floral masterpiece.
- Epoxy resin: Opt for a high-quality epoxy resin that is designed for tabletops. This will ensure a durable and long-lasting finish.
- Dried flowers: Select a variety of dried flowers that complement your aesthetic vision. Consider the color palette and the size of the flowers.
- Mixing tools: You’ll need mixing cups, stir sticks, and a torch or heat gun for removing air bubbles.
- Protective gear: Ensure your safety by wearing gloves, goggles, and a respirator mask to protect yourself from the fumes emitted during the resin application.
Images & Video: EPIC ARTRESIN
Step 1: Preparing the table surface
Start by preparing the table surface to ensure a smooth and even finish. Clean the table thoroughly, removing any dirt or debris. Sand the surface gently to create a slightly rough texture, which will help the resin adhere better. Wipe away the dust with a damp cloth and let the table dry completely.
Step 2: Selecting and preparing the flowers for resin
The choice of flowers is crucial in creating a visually stunning and cohesive design. Select a variety of dried flowers that complement each other in terms of color, shape, and size. Consider the overall aesthetic you wish to achieve, whether it’s a vibrant burst of colors or an elegant monochromatic look.
Before incorporating the flowers into the resin, it is essential to prepare them properly. Trim the stems and remove any excess leaves. Arrange the flowers in a way that showcases their beauty and enhances the overall composition. Take your time during this step, as the arrangement will significantly impact the final result.
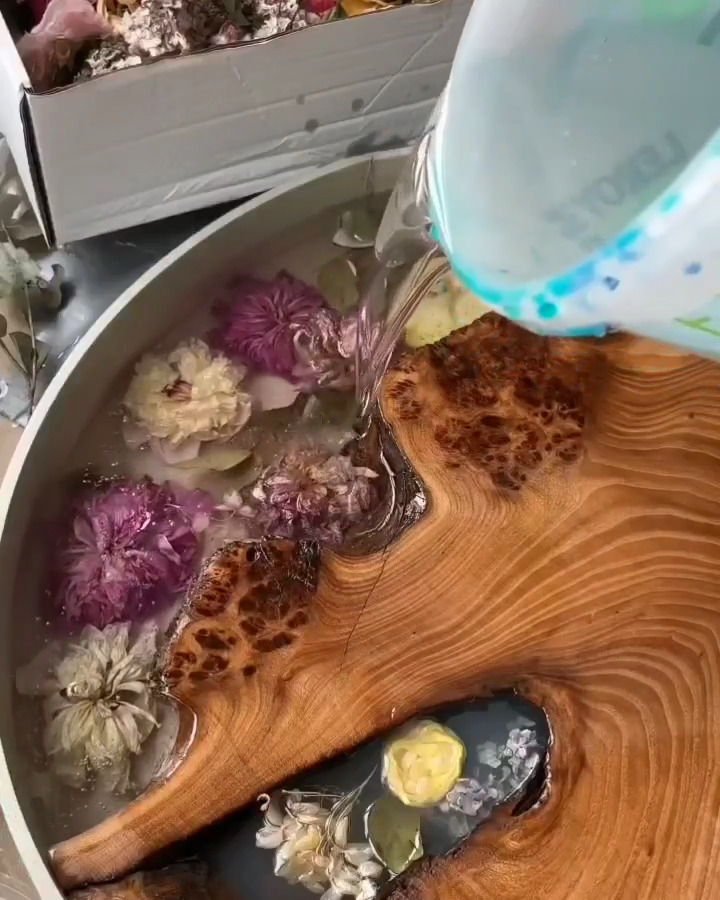
Step 3: Mixing and pouring the epoxy resin
Now it’s time to mix and pour the epoxy resin onto the prepared table surface. Follow the manufacturer’s instructions carefully to achieve the desired ratio of resin and hardener. Use a stir stick to mix the components thoroughly, ensuring they are well combined.
Once the resin is mixed, pour it onto the table surface in a slow and controlled manner. Start from the center and allow the resin to flow naturally towards the edges. Use a spreader or a brush to evenly distribute the resin, ensuring it covers the entire surface.
Step 4: Arranging the flowers on the table surface
With the resin poured, it’s time to arrange the carefully prepared flowers on the table surface. Gently place the flowers onto the resin, taking care not to press them too hard, as this may cause them to sink or lose their shape. Experiment with different placements until you achieve a composition that pleases your eye.
Take a moment to step back and assess the arrangement from different angles. Make any necessary adjustments to ensure a balanced and visually appealing design. Once you are satisfied with the flower placement, gently press them down into the resin to secure them in place.
Step 5: Applying the second layer of epoxy resin
To create depth and protect the flowers, it is recommended to apply a second layer of epoxy resin. This will encapsulate the flowers and provide a glossy and durable finish. Follow the same mixing and pouring process as in Step 3, ensuring that the resin covers the flowers entirely.
Use a spreader or a brush to distribute the resin evenly and remove any air bubbles that may have formed. A torch or heat gun can be used to carefully pass over the surface, eliminating any remaining bubbles and creating a smooth finish.
Step 6: Finishing touches and curing the resin
As the second layer of resin cures, it’s time to add the finishing touches to your DIY flower and epoxy table. Check for any imperfections or uneven areas and make necessary corrections, such as sanding or filling in gaps. Once you are satisfied with the result, allow the resin to cure according to the manufacturer’s instructions.
Curing times may vary depending on the type of epoxy resin used, so be patient and avoid moving or using the table until the resin has fully cured. This will ensure a strong and durable finish that will last for years to come.
Tips and tricks for a successful DIY flower and epoxy table
- Experiment with different flower arrangements before committing to a design.
- Use contrasting colors to create a visually striking effect.
- Consider adding additional elements such as leaves or small branches to enhance the natural feel.
- Take proper safety precautions when working with epoxy resin, including wearing protective gear and working in a well-ventilated area.
- Clean your tools and workspace immediately after completing the project to prevent the resin from hardening and causing damage.
Maintenance and care for your stunning DIY table
To keep your DIY flower and epoxy table looking its best, follow these maintenance tips:
- Clean the table regularly using a soft cloth and mild soap. Avoid abrasive cleaners that can damage the resin.
- Protect the table from direct sunlight, as prolonged exposure can cause the colors to fade over time.
- Use coasters or placemats to prevent hot or sharp objects from scratching or damaging the resin surface.
- Avoid placing heavy objects on the table, as this may cause the resin to crack or chip.
- If any damage occurs, consult a professional to repair the table and restore its original beauty.
Inspiring ideas and variations for flower and epoxy tables
The possibilities for creating unique flower and epoxy tables are endless. Here are a few inspiring ideas to get your creative juices flowing:
- Incorporate different types of dried flowers, such as lavender, rose petals, or baby’s breath, for a romantic and delicate look.
- Experiment with adding other natural elements, such as seashells or moss, to create a whimsical and nature-inspired design.
- Use a combination of vibrant and bold-colored flowers to create a statement piece that adds a pop of color to any room.
- Create a personalized design by arranging flowers in the shape of initials or meaningful symbols.
Remember, the only limit is your imagination!
Conclusion and final thoughts
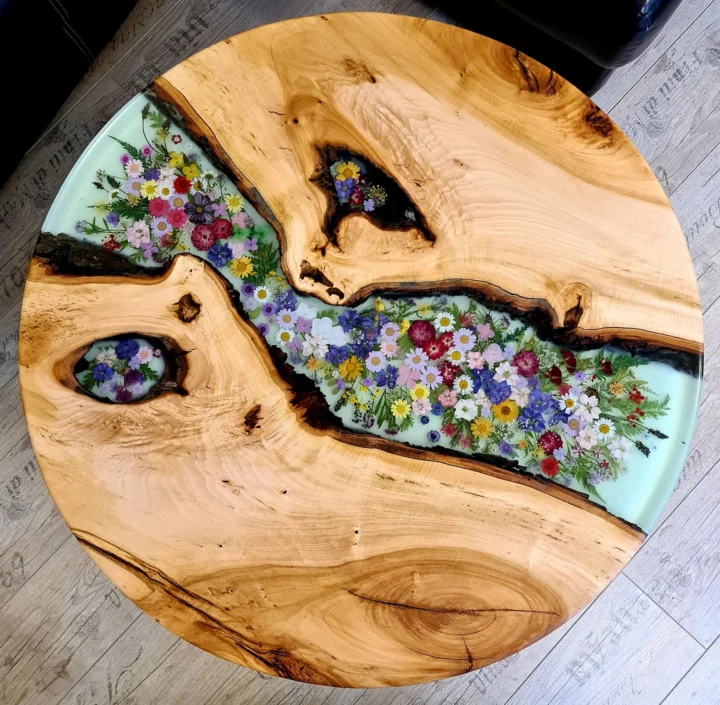
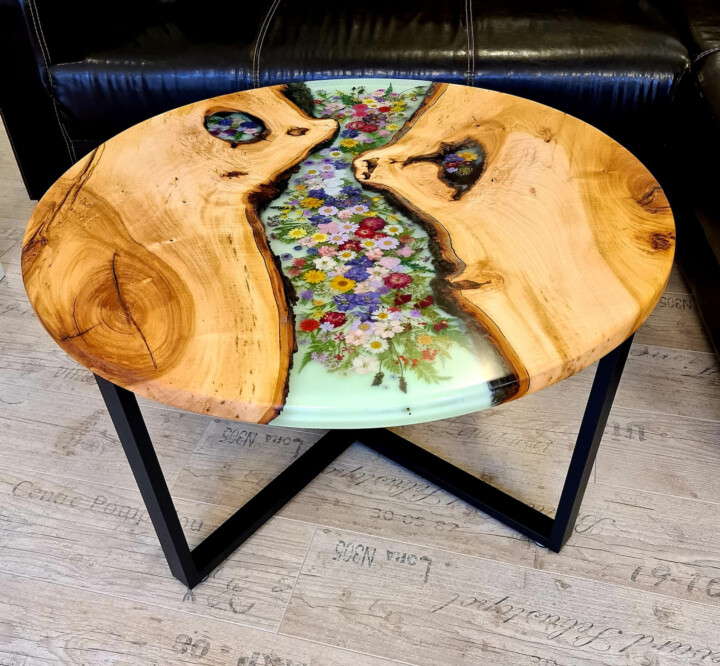
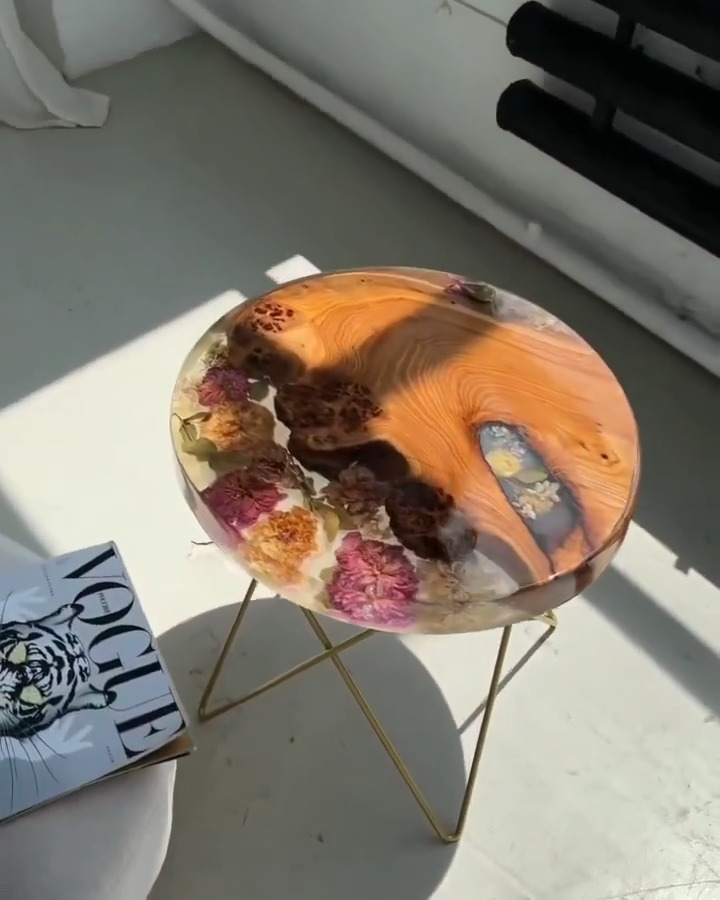
Image: Epoxy resin round coffee table
Crafting a stunning DIY table with real flowers and epoxy resin is a rewarding and creative project that allows you to showcase your artistic flair. By following this step-by-step guide, you can create a unique piece of furniture that will be a true conversation starter in your home. Remember to take your time, experiment with different designs, and above all, have fun throughout the process. So, gather your materials, let your creativity blossom, and embark on this exciting DIY adventure. Your stunning flower and epoxy table awaits!
Discover more from Decoholic
Subscribe to get the latest posts sent to your email.